SVGアニメーション – Web Animations API を使う – Element.animate()メソッドの options – endDelay
Element.animate()メソッド の options の endDelay について試してみます。
endDelayはアニメーション終了後の処理完了までの遅延時間として指定します。
アニメーションは 再生開始 → 再生中 → 再生終了 の一連の動きとみることができますが、
画面では見えないですが、再生終了の後に処理完了のタイミングがあります。
この処理完了は animate で生成したインスタンスに対し finished メソッドを記述することで
処理完了時のイベントを書くことができます。
また、endDelay の時間指定はミリ秒で指定し、再生終了から処理完了までの時間を制御することができます。
遅延時間を把握しやすいように、下記にサンプルコードを用意しました。
<!DOCTYPE html>
<html>
<head>
<meta charset="UTF-8">
<title>テストHTML</title>
<style>
.params_box {
font-size : 0.8em;
}
.range {
width: 400px;
}
.code_view {
font-size : 0.8em;
padding : 5px;
margin : 20px 0;
color : #ffffff;
background-color: #000000;
}
.code_view_str {
color: #ff0000;
}
.status_view {
margin-bottom: 20px;
}
</style>
</head>
<body>
<div class="status_view">
<div>ステータス1:<span id="status_message1"></span></div>
<div>ステータス2:<span id="status_message2"></span></div>
</div>
<div>
<div class="params_box">
<span>duration (処理全体の秒数) : </span><span class="params" id="range1_value"></span>
<div><input type="range" class="range" id="range1" value="0" max="10000"></div>
<span>endDelay (終了後の待機秒数) : </span><span class="params" id="range2_value"></span>
<div><input type="range" class="range" id="range2" value="0" max="10000"></div>
</div>
</div>
<div class="code_view">
// アニメーション処理を実行 (animation1、animation2 共通で設定される)<br />
const options = {<br />
duration: "<span id="code_view1" class="code_view_str">4000</span>"<br />
endDelay: "<span id="code_view2" class="code_view_str">4000</span>"<br />
};<br /><br />
dom_rect.animate(keyframes, options);<br />
</div>
<svg xmlns="http://www.w3.org/2000/svg"
width = "500"
height = "100"
viewBox = "0 0 500 100"
>
<rect
id = "recttest"
x = "0"
y = "0"
width = "100"
height = "50"
fill = "#999"
/>
</svg>
<script>
// アニメーション対象のDOM要素を取得
let dom_rect = document.querySelector("#recttest");
// ステータス表記
let status_message1 = document.querySelector('#status_message1');
let status_message2 = document.querySelector('#status_message2');
let animation1;
let animation2;
// アニメーション1 keyframesの定義
const keyframes1 = [
{width:'100px', height:'50px', fill:'#B0E0E6'}, // LightBlue
{width:'50px' , height:'50px', fill:'#6495ED'}, // CornflowerBlue
{width:'450px', height:'50px', fill:'#00008B'} // DarkBlue
];
// アニメーション1 オプション定義
const options1 = {
duration: 5000,
endDelay: 4000
};
// アニメーション2 keyframesの定義
const keyframes2 = [
{width:'100px', height:'50px', fill:'#F08080'}, // LightCoral
{width:'550px', height:'50px', fill:'#FFA07A'}, // LightSalmon
{width:'300px', height:'50px', fill:'#FF0000'} // Red
];
// アニメーション2 オプション定義
const options2 = {
duration: 5000,
endDelay: 4000
};
// スライダの要素を取得し、イベントを付与する
let dom_range1 = document.querySelector('#range1');
let dom_range2 = document.querySelector('#range2');
// 各スライダーごとのイベントに、共通の関数を割り当てて処理する
dom_range1.addEventListener('input', change_range_slider);
dom_range2.addEventListener('input', change_range_slider);
// スライダーを動かした時の処理
function change_range_slider()
{
if (animation1) {
animation1.pause(); // アニメーション1を一時停止
}
if (animation2) {
animation2.pause(); // アニメーション2を一時停止
}
status_message1.innerHTML = '';
status_message2.innerHTML = '';
// アニメーションのオプションを取得
const currentOptions = {
duration: parseInt(dom_range1.value),
endDelay: parseInt(dom_range2.value)
};
// オプションを再設定する
animation1 = dom_rect.animate(keyframes1, currentOptions);
// アニメーションの再生と停止
animation1.play();
status_message1.innerHTML = 'アニメーション1 再生';
animation1.finished.then(() => {
console.log("アニメーション1 再生終了");
status_message1.innerHTML = 'アニメーション1 再生終了';
// アニメーション2 生成
animation2 = dom_rect.animate(keyframes2, options2);
// アニメーション2 再生
animation2.play();
status_message2.innerHTML = 'アニメーション2 再生';
// アニメーション2 再生終了時
animation2.finished.then(() => {
// アニメーション2 再生終了ログ
console.log("アニメーション2 再生終了");
status_message2.innerHTML = 'アニメーション2 再生終了';
});
});
// パラメータ値をHTML出力
let range1_value_dom = document.querySelector('#range1_value');
let range2_value_dom = document.querySelector('#range2_value');
range1_value_dom.innerHTML = (dom_range1.value / 1000) + "秒";
range2_value_dom.innerHTML = (dom_range2.value / 1000) + "秒";
let code_view1_dom = document.querySelector('#code_view1');
let code_view2_dom = document.querySelector('#code_view2');
code_view1_dom.innerHTML = dom_range1.value;
code_view2_dom.innerHTML = dom_range2.value;
}
//--------------------------------------
// 初期処理
//--------------------------------------
// アニメーション1 生成
animation1 = dom_rect.animate(keyframes1, options1);
// アニメーション1 再生
animation1.play();
status_message1.innerHTML = 'アニメーション1 再生';
// アニメーション1 再生終了時
animation1.finished.then(() => {
// アニメーション1 再生終了ログ
console.log("アニメーション1 再生終了");
status_message1.innerHTML = 'アニメーション1 再生終了';
// アニメーション2 生成
animation2 = dom_rect.animate(keyframes2, options2);
// アニメーション2 再生
animation2.play();
status_message2.innerHTML = 'アニメーション2 再生';
// アニメーション2 再生終了時
animation2.finished.then(() => {
// アニメーション2 再生終了ログ
console.log("アニメーション2 再生終了");
status_message2.innerHTML = 'アニメーション2 再生終了';
});
});
</script>
</body>
</html>
画面にはアニメーションの定義が2つ用意しており、わかりやすいようにrect(矩形)の色が変化と幅が変化します。
アニメーション1 (寒色系の色で変化)
LightBlue
↓
CornflowerBlue
↓
DarkBlue
アニメーション2 (暖色系の色で変化)
LightCoral
↓
LightSalmon
↓
Red
また、endDelay の値をスライダーで動的に指定することができます。
動きとしては、
アニメーション1 の「再生 → 再生中 → 再生終了」後に、アニメーション2の「再生 → 再生中 → 再生終了」
という動作をしますが、
スライダーで値を調整すると、アニメーション1 の終了後に、処理終了までの遅延時間が調整され、アニメーション2 の再生開始のタイミングに影響していることがわかります。
実行例
スライダーの値をデフォルト、endDelayが短い場合、長めの場合、でそれぞれ実行例を示します。
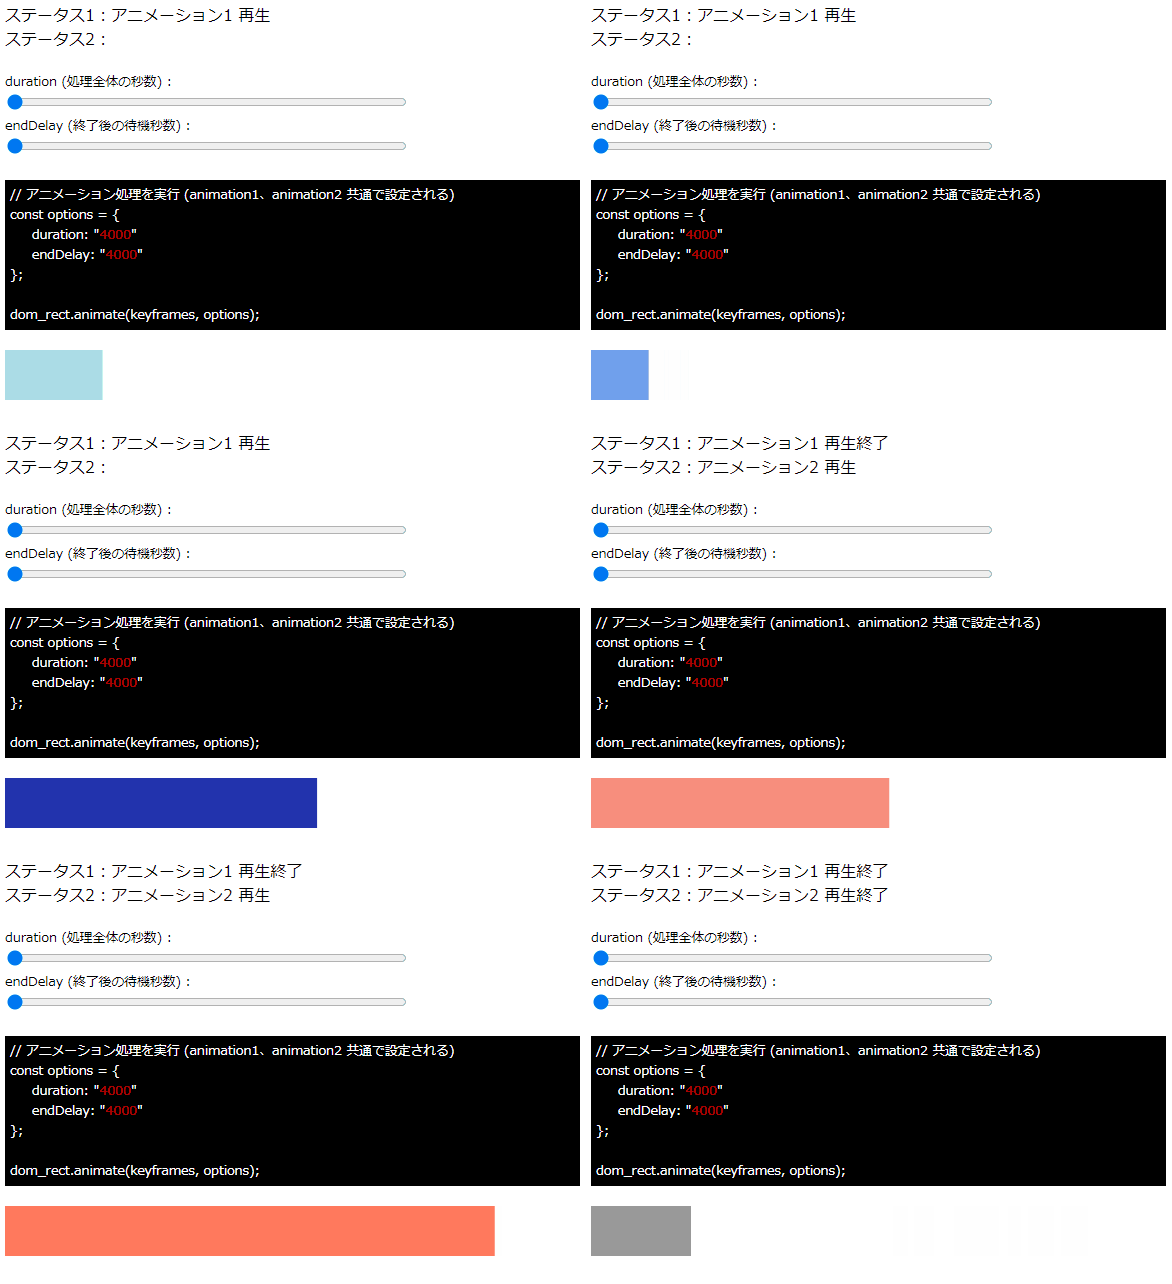
実行例1.スライダーはデフォルト(4.0秒)の状態で実行

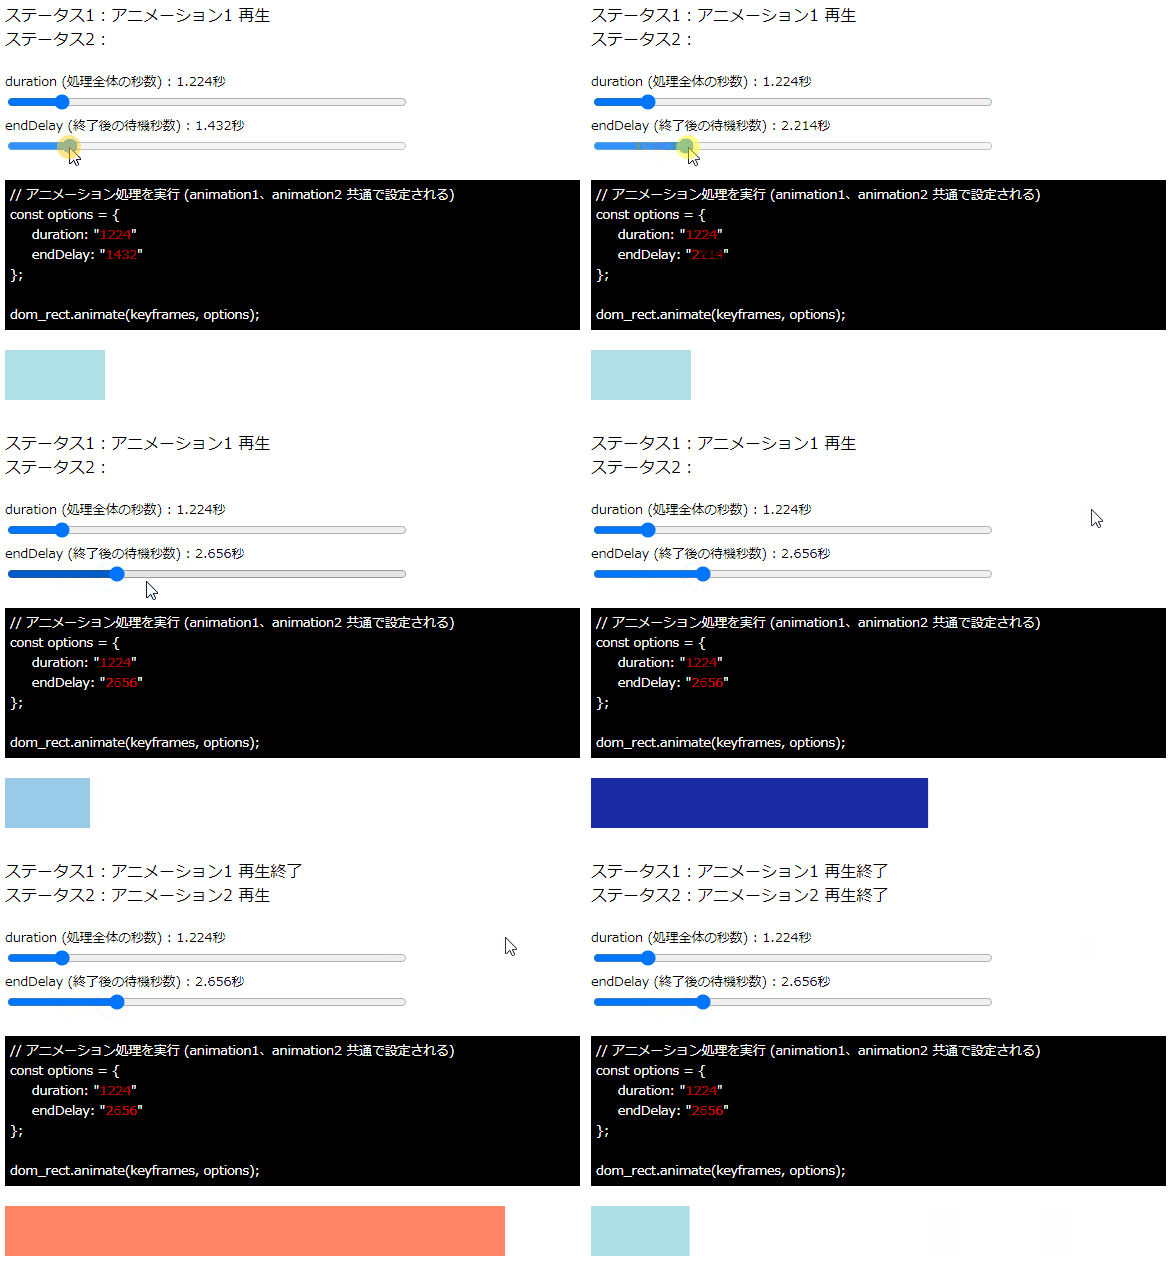
実行例2.処理全体の秒数を1.224秒、endDelayの待機秒数を2.656秒に設定した場合

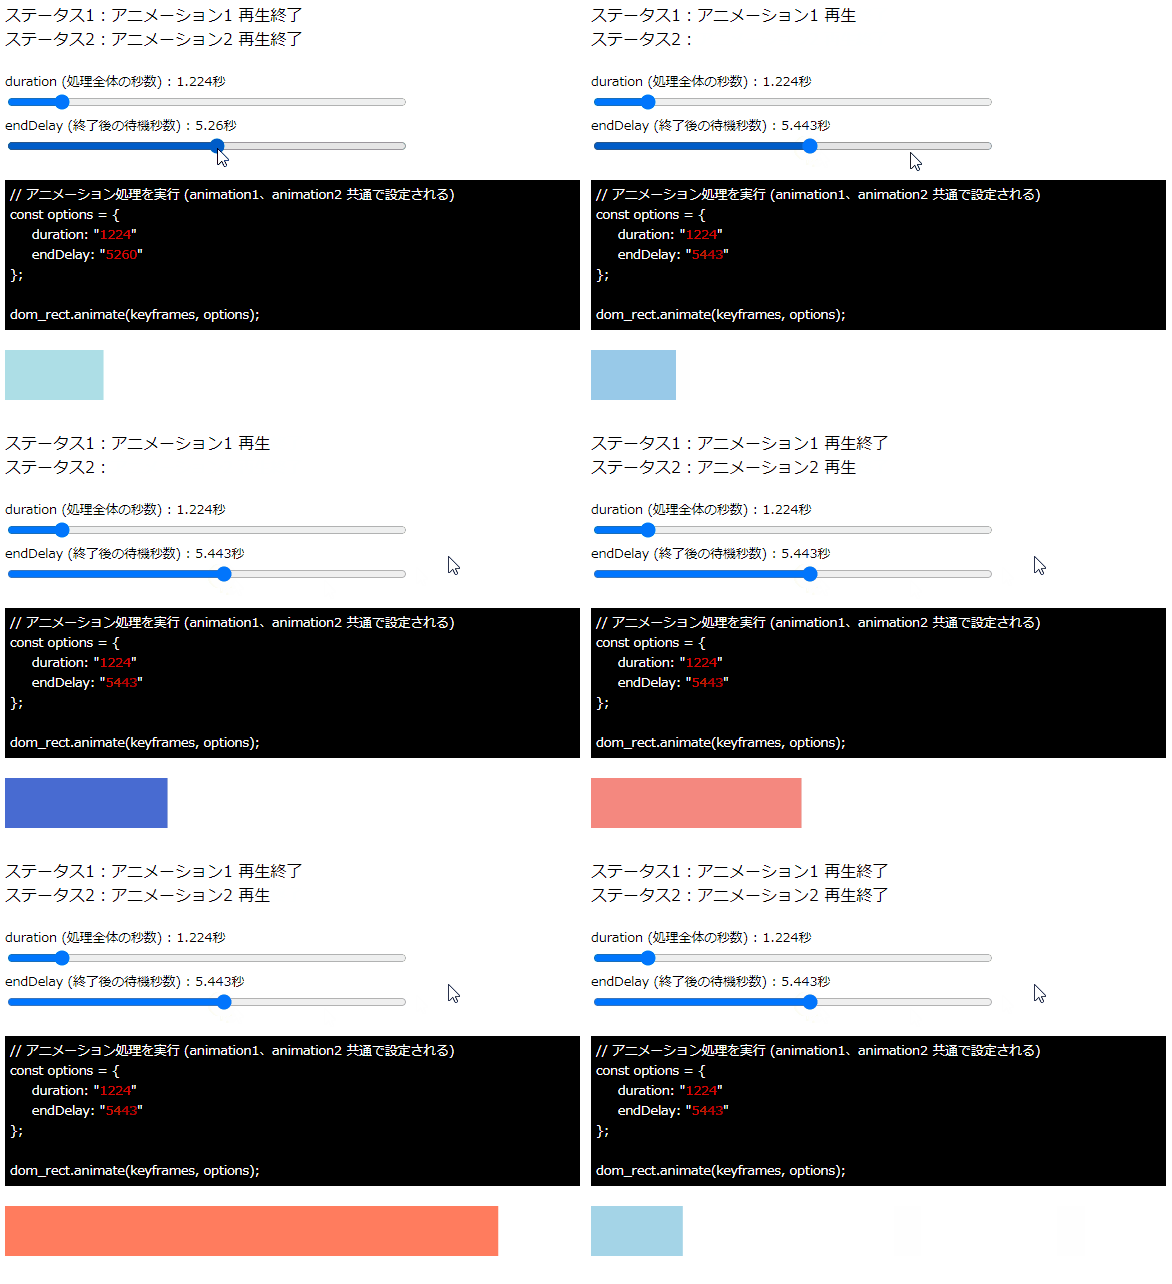
実行例3.処理全体の秒数を1.224秒、endDelayの待機秒数を5.443秒に設定した場合

それぞれのパターンの例をみると、endDelayの指定秒数により、アニメーション1が終わり、アニメーション2が始まるまでに遅延時間が変化することがわかります。
